Sunday 28 July 2013

If at first

A long, long time ago in the distant past when M was not yet in our lives I picked up a very pretty book called Vintage Crochet by Susan Cropper. This really is pretty book full of pretty things all beautifully photographed and would grace any well placed coffee table. As with many craft books I own, I admired this book but had so many other projects on the go that it sat waiting patiently on the shelf for quite some time.

When I finally did start a project from this book, it was an ill fated attempt to make a toy rabbit named Syd. This was way back when I had plenty of crochet experience but little practice reading patterns coming as I do from the background of just 'wrap the yarn, stick it through a hole, wrap it again and pull it through' school of crochet as (very effectively) taught by my nan. So it was that Syd was one of my early attempts to follow a pattern.

It all went horribly wrong. I couldn't make the pattern work. The instructions just seemed bizarre and no matter how I tried my rabbit looked wrong. Syd was the first project I cast into the frog pond and vowed never to go near the pattern (or book) again.

Time passed.

M came along and in the fullness of time I started looking for a cute toy to make for my wonderful little girl. I remembered Syd and time dimmed my memories of the frustration of trying to follow that particular pattern. Syd the Rabbit was a lovely toy with a sort of timeless quality about it and so I decided to give the rabbit another go.

Of course now things were a little different. I had followed other patterns and no longer felt the need to slavishly follow instructions which made no sense. The other big plus was other people had made the rabbit and I had the benefit of their notes via Ravelry. I read what other crocheters had to say and found I was not the only one to find this particular pattern difficult to follow, which really is a shame because Syd is not a complicated toy.

I read the pattern again and came to two conclusions:-

The designer has her own way of writing out her pattern which I personally can't follow.

This toy was never intended to be played with by a real toddler who is very hands on, in a pull or poke it to see what happens next kind of way.

I decided the only sensible thing to do was to use the pattern as a guide and the inspiration, but to do my own thing.

Six months later, the last two months of which the rabbit sat waiting for me to sew its face on, I can finally reveal my version of Syd, or Hop the Rabbit as M named her a few moments after the last stitch was placed.
Hop The Rabbit
I didn't really keep track but was winging it the whole way. Worked in cheap acrylic on a 4mm hook, Hop is significantly bigger than Syd, achieved by adding in a few rows between decreases to give a longer body. I had to scale up the head, arms, legs and ears to match. The feet I completely changed because I didn't want to use triple triples because they would leave big holes my toddler could poke her fingers though. I decided against a pompom tail for similar reasons as M likes to pull things apart so I could see a pompom being very short lived.
Hop's bunny tail
For the face I tacked in the rough position of the features then just did a tight satin stitch over the top in buttonhole (or top-stitch) thread. On reflection, were I to do it again (or for another toy) I'd use a contrasting yarn instead of thread as I think the effect would be neater as well as quicker to sew in place.

M was delighted that the rabbit finally had a face, hovering close as I worked on the embroidery and even helping to pull a few stitches through. She decided this is a girl rabbit and named her Hop. Hop was immediately put through her paces and prepared for her first scooter ride.
Hop puts on her helmet
Here she is riding on her 'scooter'.
Hop on her 'scooter'
Now the project is complete I'm happy with the resulting toy. I do think the pattern is poorly written and if making this toy you need the errata (found here - including full pattern) before attempting to make Syd. Or just use the pictures in the book as your guide and have fun doing your own thing.

Tuesday 23 July 2013

It never gets old

Mary Arden's Farm near Stratford is proving to be one of our favourite haunts this year. On Saturday we headed back for our fifth visit since Easter, drawn by the Crafty Beast event. Not that we really took part in any of the organised entertainment as M just wanted to explore (as always).

What I particularly like about the site is how something new seems to capture M's attention every time we visit. This time was no exception. While M wasn't interested in the arena (other than liking the bunting and wanting to try out the obstacle course intended for ducks) she did enjoy playing hook a duck while we chatted to the people from Transition Stratford. The ducks were there to illustrate a report about some plastic ducks that were part of cargo lost overboard in the Pacific and were then tracked around the world as they were carried by ocean tides. Apparently at least one duck made it as far as The Arctic!

M naturally said hello to the cows, one of whom was very appreciative of a bit of fuss from Dave attempting to engage in a spot of mutual grooming and thoroughly sliming him in the process. Naturally M found this very funny. We were also very taken with the ferrets which M had never seen before.

We rediscovered the two wells outside Mary Arden's House and M was particularly happy to see one of them still had a pail attached. M has been fascinated by the concept of wells and what they were used for since our last visit. There were two wells at Astley Castle which equally captured her interest and seeing the wells was something she'd been looking forward to. We looked at the pail, talked about the winch and its use, looked at the water and sang Jack and Jill before M pointed out the pail was big and would be heavy which was probably why Jack fell down, so perhaps he should ask a horse to help him. I just love the way M's mind works and is making links all the time.

Next Dave distracted M with a trip around the garden and feeding the goats while I talked to the Stratford Spinners and Weavers (more about this later).

We ate our picnic lunch in the playground and for the first time ever M didn't immediately head for the swings but was more interested in the small obstacle course. After lunch Dave and M watched some goat races but the goats got confused and ran back the other way, causing M to declare them not very good at racing.

Goat racing done, we went for a wander to check out the wild flower meadow but didn't get that far due to distractions. M discovered that thistles are prickly and apples grow on trees. We inspected some impressive cracks in the very dry ground and then we found a willow tunnel complex or bower which M loved. The tunnels were sized to allow easy passage for a small person but were a bit tight with low ceilings for those of more adult proportions. M found this very exciting and ran though the tunnels repeatedly, shrieking with glee and giggling the whole while.

M running amock in the bower
M finds a gap to peer through
We eventually trapped the small person and carried her back to the car. Home we went and after a short nap we carried on with this...
Cardboard braiding disk with braid
This is a small braiding 'disk' made from cardboard which I was given by the Spinners and Weavers. It was one of many that they had prepared to demonstrate weaving or braiding cords. It is a fantastic idea as the cardboard grips the threads holding them firmly in place as you braid. This is based on a Japanese method of making braids called kumihimo but The Tudors would have been able to make similar braids using finger loop braiding.

The pattern is easy enough to follow. Make an eight sided disk, roughly octagon shaped and poke a hole in it using a pencil then cut a slot in each of the sides.
  1. Take seven pieces of yarn or thread of your choice and cut them so they are of approximate equal length. 
  2. Knot them together at one end then poke the knot through the hole in your disk.
  3. Arrange the threads through seven of the eight slots and tighten then up to tension the braid.
  4. Hold the disk with the empty slot nearest to you then count three threads to the right.
  5. Pick up the third thread and move it to the empty slot, tightening it as you do so to maintain tension.
  6. Rotate the disk to the left until the newly empty slot is in front of you.
  7. Repeat from 5
And that's it. Keep going and you will make a braid.

This has become a joint project with M. We count off the threads together and name the colour, then M picks up the chosen thread and moves it to its new slot. M has decided she likes the burgundy thread the best. This project is great for practising counting, talking about colours, patterns and working on those all important fine motor skills as well as lots of fun. We're both very impressed with the resulting braid which is working up quite quickly.

Friday 19 July 2013

And we have bread

The recent unexpected spell of overly warm weather (AKA summer) has meant that I have actually managed to get bread dough to prove in a timely fashion.

Tuesday 16 July 2013

Teeny, tiny

I am on the hunt for teeny, tiny crochet projects that I can do in the few moments I have my hands free and I'm not busy doing something else. Since becoming a parent, these moments have been rare and I find I need something I can pick up then put down again at a moments notice with little impact on the project in hand. It must be something that doesn't care about consistent tension and will tolerate extensive ripping back because I got distracted at the wrong moment. To minimise frustration, any pattern must be foolproof and not assume I can count or remember what I was doing the last time I picked the piece up. Avoiding the tiniest hooks is also a must as is over reliance on stitch markers. Meanwhile the yarn must be hardy stuff which is easy to untangle and reuse. Minimal sewing or making up and no pins beyond those needed for blocking are also essential. If it can get away without being blocked, even better.

Any (sensible) suggestions happily accepted!

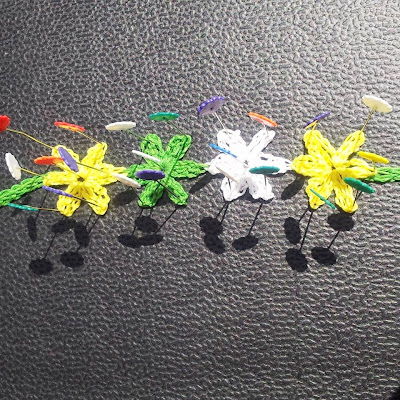
In the meantime, I had a go at making a teeny, tiny bracelet.

Millefiore flowers
Here we have four 'Millefiore' from 201 Crochet Motifs, Blocks, Projects and Ideas by Melody Griffiths, worked in stash crochet cotton thread about No. 10 weight. I'm afraid the ball bands are long gone, so I can't tell you the brand. I used a 3mm hook and they came out fine, but I would have used a 2.5mm hook had I been able to find one!

I joined each of the flowers as I made them up, then added a Base-ch/dc band approx 15cm long to each side, which I think should be long enough to tie them to a child's wrist.

Bracelet after light blocking... Photographed in the sun, just look at the white!
A teeny, tiny project that was done just for fun.

Sunday 14 July 2013

A Sunday trip to the park

It has been another scorcher of a day here in Coventry so we decided to make the most of it and headed to a local park. Sadly we don't have any nice parks within easy walking distance, the few we have tried are small, prone to dog poo, vandalism (sometimes involving dog poo), have poor play equipment or attract the wrong kind of visitor. This means that to find what we consider a nice park we have to get in the car so when I say local, I mean in or near Coventry.


Thursday 11 July 2013

This Old Man

Very proud mummy moment. Today M made her first mostly solo craft project, This Old Man.

This Old Man, made by M (July 2013).
M has been practising with scissors for a couple of months now, but mostly cuts for the sake of cutting rather than making something. Such is her drive to cut things that scissors have become a bit of a hazard to any other craft or art project. Today's cutting and sticking session started out with the usual stickers, sequins and random cutting. We took a short break to pick up all the sequins which M had liberally scattered on the floor then M got her second wind and This Old Man was created.

M explained that This Old Man is a hairy man with hairy boobies and hairy legs. He has two eyes, one on each side of the paper and rainbow hair. This Old Man also has a loop of tape on the back because he is a 'man mask'. M did all the cutting, shaping and sticking for this project. The inspiration is also hers and we repeatedly sang This Old Man as she worked.

After a brief interlude, This Old Man had a makeover as he prepared to do ballet and go to the moon. M has deliberately added some notches for his helmet, ruffles and moved one hairy booby (to his knee) to make room for some stars.

This Old Man dressed for ballet and a trip to the moon.
I am very impressed. We do a fair bit of crafts, some directed by me with M's own unique spin included and some where M has a free hand to do whatever she wants. Today, my only input was to supply the materials requested, to advise on glue application and to break off a bit of tape when asked to do so.

M reports that This Old Man is not very good at ballet and needs lots of practice. He enjoyed his trip to the moon and naturally took a (soft toy) dog with him, but his landing was a bit rough caused his hair to fall off!

Monday 1 July 2013

Fathers Day came a little late

Father's Day coincided with M's birthday this year and sadly for Dave, M's birthday celebrations took precedent. Not that we forgot him and M did work hard to make suitable gifts for her Daddy, but we held them back for a week as M was rather focused on her own special day, after all it's not every day you turn three!

A little cannibalism

We had this year's first sighting of ladybird larvae yesterday morning as we were preparing to head out to Astley Castle with a picnic. The forsythia next to our front door was quite literally crawling with them in varying sizes and stages of development.

M was very excited, declaring them caterpillars... Which had us explaining they were indeed similar but were baby ladybirds not baby butterflies. M wasn't to be deterred though and insisted they were caterpillars. M likes caterpillars.

She was particularly excited to see this pair...

One ladybird larva eating another one that had started to pupate
You are looking at a photo of one very large larva, actively engaged in eating one of its fellows that had started to pupate and was therefore defenceless.

Lovely. We're very tempted to move a few of them round the back where they might find more aphids to chomp on!